
I have always been impressed by individuals with both a creative mind and the ability to actually deliver a work of art. My definition of art is probably narrower than those in the representative field and has some definite parameters for me to consider worthy of my attention. First off, it must be something I find unique. If it can be reproduced in large batches it is not fit my definition. Nothing catches my attention more than when I see a common object that is rendered from a completely non-traditional viewpoint or perspective. Secondly, it has to take some time to create. A single stroke of paint across a white background is not art. A vase sitting in the middle of a room with a white goldfish swimming in gold colored water with a human figurine on a fishhook is not art. And lastly it has to be worth actually looking at. The last one is pretty subjective, but the last time I was at the Chicago Museum of Art the displays in the basement consisted of the following two displays. One room consisted entirely of dead birds stuck on large sticks and stuck in upright in the floor. Each bird head was then covered with the shell of a stuffed animal’s head (as in just the outer covering). After dismissing that display of having any value I was met with a room full of black and white photographs of people’s scars. Crisp and well lit images, but boring and uninspiring.
I can feel the art snobs getting their panties in a bunch about how art expands the mind and shouldn’t be confined to established ways of thinking. I am guessing these people are going on and on about the symbolic images entwined in the goldfish display detailed above. Pontificating on how society has lost are own color but unaware because we are bathing in the false reflection. The fishhook clearly representing a desperate attempt to dye (metaphor) in color. Seam reasonable to you? A display for the enlightened and profound? If so, then I have proven my point. I made that particular scene up 5 minutes ago.
On a personal front, a hobby of mine is trying to reproduce pieces of art I find fascinating. In no way do I hope to achieve the same level of quality on a particular piece but then again, I really do not consider myself an artist. I enjoy experiencing the journey and insights from other more creative minds. Typically this process starts by seeing something that catches my attention. If it is something that fits my definition of art (see above), the very next thought is whether I could produce something similar. This does not have to be in the same image or even in the same medium. Maybe the creative thought can be expanded or possibly a complete different approach could be used to create it. If this is feasible, it goes on my list of things to do when I have some free time. This list is fairly huge, but like the “Life List” it is constantly being worked.
That was a very long intro to my most recent execution of the art process. I found a link on the web to an artist that actually carved/sculpted in the colored wax medium. In particular, he made pieces of art out of standard Crayola Crayons. I was blown away similar to when I saw images of geometric shapes made of carved pencils. After about an hour of pondering this art form I decided it would only require crayons, small carving knives and some steady hands. All of which were readily available (at least the first two materials). It was time to get to work.
I now had the end goal in mind. First a quick trip to the store to get some crayons. The next step was to devise a plan of attack. I would need a way to make a pattern on the crayon so I would know where to cut. Once the pattern was put on I figured a razor blade could be used to shave away the wax. A little bit of patience and presto a piece of art would pop out. Unfortunately, that was not the case. To get this far took more that anticipated.
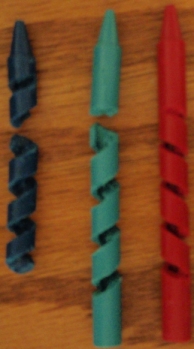
I am not going to give all the details to make it interesting for others who enjoy this type of journey, but I will give some insights to help you out. I used tape to put the pattern on the crayon. The thinking is this would also give some support to the crayon as I began removing material. This was a good assumption that worked out to some extent, but not sufficient to prevent catastrophe in the early attempts. By the way, I did end up using an exacto knife instead of a straight razor blade which saved a tremendous amount of fatigue on the hands. The wax did dull the blades pretty fast so recommend you have a few spares around. Diving into the first version, I started carving immediately after putting the tape on. The chosen pattern quickly pointed out a flaw in my approach. After carving for about an hour realization hit that I didnt’ know how deep to cut. The crayon had some serious weak points in it by making the spiral too thin on the bottom side of the carving. Eventually I dug too deep (much like the dwarfs did in the Tolkien Trilogy) and the result was a disappointing mess – see the attempt on the far left.
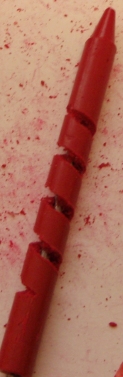
That image lets the cat out of the bag that this required a number of attempts. Modification to process required. I needed a way to know when to stop carving from the top. There had to be some indicator put into the crayon as a guide. A trip to the garage resulted in the idea of a large finishing nail. Getting this guide in place ended up being as difficult as the carving. Rather than just give away how I did it, I will tell you that it required a significant amount of patience and HAS TO BE CENTERED in the crayon. Easily typed, difficult to execute. You can barely make out the guide in this image.

Two crayons were complete destroyed getting this perfected. With nail correctly placed I was able to carve the tealish crayon in the image above. I was working from the bottom to the tip and pretty pleased with the progress until trouble reared its ugly head. I overestimated the length of the nail and didn’t taper (thin) the carving enough. When the final cuts were being put into the top portion of the crayon I felt it give.

3 hours of work wasted. Two changes had to be made to prevent this in the future. First off the taper had to happen before the end of the nail. Secondly, there needed to be side supports to give it more support as I neared the tip. I ended up embedding wire on the outside of the pattern which ended up adding at least two hours to the carving time working around the wires and delicately removing the tape holding the wires so I could finish the carving. Hint, use one of your extra sharp blades to slice the tape rather than unwrapping it. Once the majority of carving was done, I switched blades and started cleaning up the cuts. Pressure was on at this point since the crayon was fully exposed and in a weakened state. Any slight misstep here would cause heartbreak. Also make sure the nail can slide in and out easily since any pressure will surely collapse the spiral.
Follow the jump to read the rest of the story
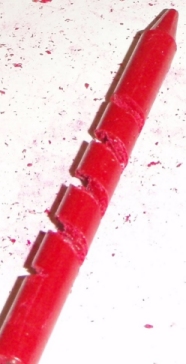
You should be able to tell I stopped much sooner in order to prevent the error on the previous attempt. It did not look as perfect as the image I saw on the web, but based on the effort involved, I’m pretty pleased. The next problem was how to preserve it. This is one area that could use some definite improvement, but I decided to only use existing material around the house. The principle was to provide a sturdy structure that could highlight the features of the crayon. Numerous designs were created of varying complexity. The chosen one consisted of two pieces of plexiglass (left over from fixing my broken Rock Band drums) and some oak scraps left over from some shelving I had previously built. Somewhat rushed I cut out some oak blanks to form a rudimentary stand. The body blank was put on the drill press in order to get start and end points for the scroll saw cut. That cut ended up being a nightmare due to freehanding it (pure laziness) so it came out wavy (ugh) and probably more embarrassing, too wide. The plan was to mount it in the standing position, but the extra space due to the wide cut gave it some movement left and right within the hole. Movement could cause too much pressure on the spiral sides possibly giving a short lifespan to my new piece of art. Simple solution. The holder would sit horizontal.
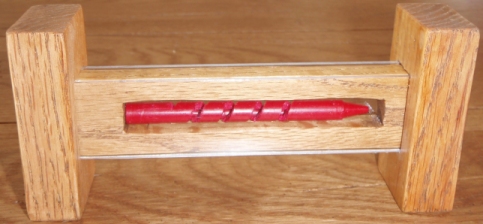
The stand parts were sanded up, stained and varnished. While that was drying I cut the front and back plexiglass plates. The end pieces had to be carved with a chisel. Once the plexiglass pieces were added to the body fixture, the required thickness of the end slots were marked and chipped out. With everything finished up and dry the crayon was carefully inserted into the case and encased behind the plexiglass.
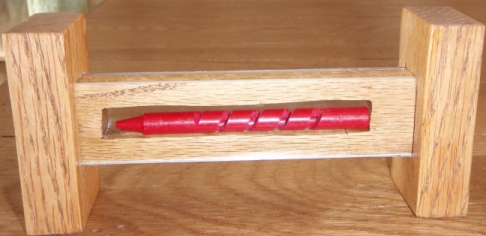
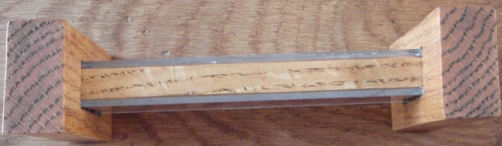
Wow, the wavy cut really comes out clear in the image. Some point in the future I’ll think up a much better design. Since I enjoyed doing this maybe I’ll build one that holds a number of crayons next time. Here is a view from the top in case you are interested.
All that was left was to name the finished product. Turns out the crayon color was called RazzMatazz. Funny since it was just called red when I was a kid. Razza… Mazza…. Azza.. wait is that blood? crap, the exacto knife got me…wait…Exacto, Razz, a, Matazz… Got it. ExactaRazzaMatazz. Another project off the list.
This post seemed to almost take as long as the actual event. The next time this is attempted, I think I’ll try and introduce heat in order to get a smoother more finished edge on the crayon. I also want to change up the design and do more of a sculpture than plain cutting. Look for followups during the rest of the year. Oh, and kudos to the creative mind that produced the web reference which was the catalyst for all of this.
