Archives

Project Halloween Butters and Dragons

Seems like an odd time to be pulling out a Halloween post don’t ya’ think?  Truth be told, we were celebrating my friend in haunt’s (Brad’s) 30 year service anniversary at work and the topic of Halloween came up – which to be honest isn’t that odd as we are often talking about Halloween – a year long holiday for the two of us.  Brad is working on building a CNC machine which I am hoping is ready before too long.  I have big plans for that thing hehehe.  Anyway, all that talk about Halloween reminded me I still had some 2018 Halloween posts I had not gotten to.  So, tonight I bring you the annual Halloween pumpkin carving for 2018.

Halloween Pumpkin 2018

Only 7 month’s late, but what the hell that’s nothing compared to the backlog of wildlife pictures I need to get through.  After the yeoman work of putting on the Annual Halloween Haunted Trail event (link here) at the beginning of October, it always seems a bit of a letdown when the actual Day of Haunt comes around.  Last year we opted to drive around to check out the worthy displays in the surrounding local towns.  When we got back I was truly inspired and went to work on getting the final carving done on the foam pumpkin.

Halloween Pumpkin 2018

Hit the jump to see some progress shots.

spacer

January, the New October

It may be white and fluffy on the outside, but it’s full on orange inside at Intrigued.  If you have spent any time on this blog you should be keenly aware that Halloween is a special holiday around here.  In fact, it is pretty much a year round activity.  We spend our off months preparing for the Annual Haunted Trail of Tears so we are ready for the big event.  I say that in jest, because we are never really ready for it as every year is a mad scramble to get all the projects wrapped up, the multi-day trail build  and then the extended weeks of effort to get it all packed back away.  All that work for a single night of spook with friends and family.  One of my traditions is to carve the annual pumpkin on Halloween night.  The party is actually at the beginning of the month, so usually I just finishing up the hard work and looking for some relaxing fun to put a bow on another year.  Last year I almost go there, but I opted for a theme that took me a LOT longer than intended.

Pumpkin Carving Halloween 2018

Hit the jump to read some details about the carve!

spacer

Operation: Something To Crow About

Ever have one of those days when you look back and wonder how you got everything done on the must do list?  How about two days in a row of that?  Three?  Well, I can honestly say the last FOUR days have been one for the ages.  It is fairly late on Sunday and about the first time I’ve been able to sit for a few minutes not to mention reliving my college years sleep cycle.  I’ll leave out the details for now since the last four days have been filled with upcoming blog topics, but for a short summary the real journey began after work on Thursday with hauling water and working on decorations.  Friday morning began with decorations and doing my best to get stuff ready for Saturday without tiring myself too much and avoiding injury at all cost.  Friday night was spent running a half marathon in a cemetery (until midnight)  followed by Saturday morning early rise to spend ALL day setting up the haunted trail for the cookout that night.  Up early again to haul everything back out of the woods during the day and then finding out Project Auuuunnold was going to go into a new phase tomorrow morning requiring me to spend all night prepping for that.  Of course, a big thanks goes to Linda as well otherwise this would have been pretty much a non-starter.  The good news is it’s done and there’s plenty of time for sleep and recovery!

Since Halloween is officially coming up later this week, figured I’d pay tribute to one of my favorite past times – that’s right, the annual pumpkin carving (and the images were already processed which helps out when trying to get a quick post out).  Thought you might be interested in the process I use for my pumpkin carvings.  I tried to take a number of pictures during the process to help show the different stages.  In fact, there are so many pictures in this post I’ll likely let them do the talking and go light on the text. … and we’re off..

The first step in the process is to figure out the theme.  Every once in awhile I have a subject already picked out, but more often it is usually a night spent parading through pages after pages of Google Images.  This process can get a little dark and be warned you might stumble upon some images that just might be emotionally scarring.  Search terms such as demon, haunted, warlock, devil, gothic, horror, vampire and … ummm yea, I’ve taken “terror” off my search list for obvious reasons.  Each one of those words will produce a very healthy (err. better word..  large) collection of images.  Your goal is to find one with a lot of contrast that works in a 3 color palette.  I usually download a number of images and then proceed to do test palette reductions to see which one works the best.

This year’s winner was…

I actually found it under the gothic category.  As a big fan of The Crow this seemed like a perfect fit.  Before going further, always heed any copyright issues.  The site AllBackgrounds.com listed these images as free but just in case, all rights to this images remain with the original owner – my use is personal only and no revenue is generated off the resultant pattern or carved pumpkin.  With that out of the way, the next phase is to convert the image down to a 3 color palette.  This takes a lot of trial and error and recommend only reducing the colors a little at a time to make sure the conversion thresholds work with the image you are trying to produce.  Paint Shop Pro is my go to tool due to the relatively simple menus (still using version 7 before they went off and tried to compete with Adobe).  Save often and be prepared to backtrack if you lose a feature.  The following shot was pretty far along in the reduction process.  Notice how crisp the lines ended up (thanks to  some quick zooming in and pixel correcting where necessary) which is perfect for the end pattern which maintains the desired effect.

At this point I start the more creative aspect of the project.  Basically you have to zoom in and hand correct any dithering that still remains and add any “pumpkin nuances” that are required.  These little features are needed to generate a pattern that can actually be carved and once cut will help extend the life of the end product.  I am absolutely fed up with all the sites on the internet offering up free patterns that DO NOT WORK!   These fakes are easily noticed once you know what to look for ..and/or if you’ve blown a few pumpkins like I have in the past.  Look for areas that are not cut out – if you see a cut that make their way all the way around it .. bad pattern!  Trust me, you will start noticing the fakes now – they are generally produced on a graphics program, converted to the proper colors and slapped up on the website as a freebie patter (really irks me).  Do you notice any of the features I added below….

Hit the Jump to see how the pattern turns out!

spacer

Confront Thy Fears – Halloween Party Pt 1

I see my absence from posting hasn’t shocked anyone into calling out a search party.  Alas, all is well, but life is a little hectic at the moment.  We had Teacup Agility Nationals this month, new international assignments at work and of course in the midst of all this is our annual Halloween Party.  If you recall from a previous post (link here), Halloween is one of my favorite holidays and both Linda and I enjoy decorating up the place and having some of our friends over for a few libations while enjoying a bonfire.  This year we expanded our haunted trail, but more on that in the future for today is all about orange colored foam and implements of destruction.

So first off, a quick quiz.

  • What is my favorite Halloween activity?
  • What is my most feared and despised occupation … hint, some would call it a phobia?

Queue annoying Jeopardy music.   Please put your pens down, it is time to reveal the answer.

Did you answer correctly? I will also accept decorating and scaring neighbor kids for the first answer, but ANY answer other than #$@#$%^&$ clowns is completely unacceptable. So it was time again to add another pumpkin to the collection. This one officially brings the collection to 18. As with the last 5 or 6, I wanted to make my own pattern. Half the fun is trolling Google Images trying to find the perfectly lit photo or image to transform into a scary nightlight. This year turned out to be a little frustrating. After trying all my favorite keyword searches like ghoul, demon, vampire etc. I kept coming up empty on good specimens to transform. This step takes a tremendous amount of time and I didn’t have time to waste on an image that wasn’t going to produce a nice silhouette for a pumpkin. There were one or two that might have worked, but I just wasn’t feeling it. Time to take a step back and go at it from a different angle. A self assessment was needed to figure out what would make this year’s carving memorable. An inner dialog  was initiated with one common question. What creeps me out? If there was something out there that scared me, made me uneasy and gave me the heebie jeebies, what would it be?  A certain president jumped to mind, but quickly dismissed it since American voters have wised up to socialism so what else was there? … and then a light bulb went off. There is really only one obvious answer. It was time to confront my phobia head on… take it by the big nose and beat it into submission. To say I was unprepared for what was ahead would be an understatement. A few key taps in the Google search field S C A R Y  C L O W N produced a collection of images so hideous, so vile and so demonic that I broke out in a sweat and nearly screamed. However, I was committed to this task and no mime loose in the department store lipstick aisle was going to deter me. Slowly I navigated through the thumbnails which were not surprising 85% pictures of Pennywise but there was not an image that had enough contrast required to produce a good stencil. Still sweating from staring at all those clowns, I was forced to switch to my secret backup. Here is a tip to keep between the LifeIntrigued family shhhhh tattoo stencils make great pumpkin stencils starting points shhhhhhh. Turns out our crafts have some similarities and one of the reasons I enjoy watching tattoo artists and their reality shows. A quick jump to TattooDonkey.com and within seconds I had the base image. Disclaimer. The image selected can be found by entering Scary Clown in the search field. I have no intention of providing anyone else the stencil above and all rights remain with the original creator. Now I have already blogged about how the transformation from image to stencil goes (link here), so I will not bore you with those details again.

Hit the jump to see some additional comments and pictures of the final product.

spacer

Have A Ghoul Day Today

Happy Halloween everyone!  Today happens to be my favorite holiday.  I am not exactly sure how this came to be, but since I was a little demon I have always been fascinated by this day.  I still remember a number of my costumes ranging from the classic cheese Spiderman to the pretty cool Zorro.  The latter was especially awesome because my brother’s friend Kevin taught me how to greet the candy givers in Spanish which helped complete the look.  The most enjoyable part of the holiday has to be the barbaric massacre of the orange flesh.  That’s right, the butchering of the pumpkin.  There has to be a study out there that correlates the number of late year stabbings by the sheer viciousness a youth attacks a pumpkin.  I have visions of Orange Juice right now and I don’t know why.   As it turns out, it became kind of a quest with my brother to make a scarier and cooler pumpkin carving year over year.  Over those years, the process was refined to near perfection.  We had the perfect tool for gut scraping, the approach to the scariest eyes and the best cutting utensils to create a smooth and flowing cut.  Needless to say, I think after the first year, there were no more triangles in our pumpkins.  Now I have a urge to go back and find the old pictures.  Would be pretty neat to have a pumpkin through the years collage – note to self.

We were also able to get together along with his kids to carve some pumpkins a number of years ago.   Looked like the skilz’ had passed on to the next generation.  I am not sure if Ron has continued to carve, but I have carried on and have continued to refine and try new avenues.  The largest improvement came with the foam pumpkins.  These are fantastic in the sense you do not have to worry about the rot.  Nothing is more disappointing that throwing out a green fuzzy glob after spending so many hours making it just right.  It also allowed for more precise carving.  About 15 years ago, I had an idea of using the Dremel (I am not taking credit for the idea because I assume many others had done it, but I can honestly say I had not seen it done at the time).  The catalyst for using the Dremel is the desire to do the now common half cuts.  I laugh every single time I think of that night because I was using the engraving ball bit for about 2 hours straight.  I got off the floor and looked in the mirror to see my entire shirt and face covered in pumpkin flesh – the pumpkin rocked though – it had a Blues hockey theme with blues symbols for the eyes (one reversed), a puck for the nose and I thinking a missing tooth grin (everything was half cuts so it actually stayed fresh for over two months.  With the new foam pumpkins, I can work the half cuts to the precise depth I want and get very clean edges.

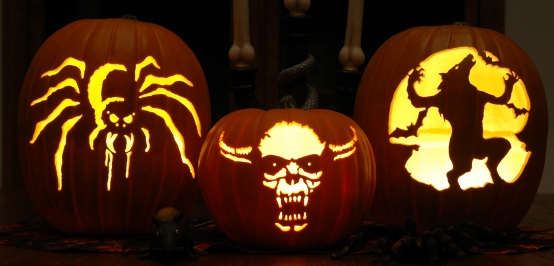
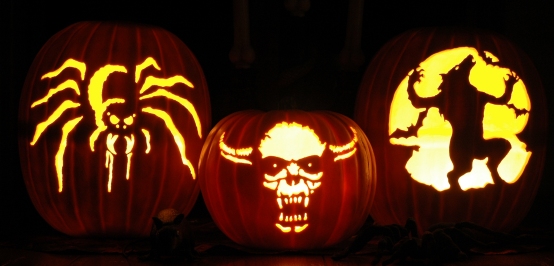
Here are my 2008 additions.  Note, the spider was stock, but I work a lot on making my own patterns from photos or drawings I find on the web.  A number of hours with a graphics program can turn out some pretty cool designs.  The werewolf and demon were results of that type of effort.  Note, I also embellish a lot with bats for the sole purpose of solidifying the cutouts and hopefully adding to the longevity.

New 2008 Pumpkins

Here is a darker version to give the full effect

2008 Pumpkins

Figured I would also show some of my other efforts

Previous Pumpkins

and with less lights – they definitely look better in person and generally get good comments about them from the Trick or Treaters that come throughout the night.

Previous Pumpkins

Have a safe and Happy Halloween!!

spacer